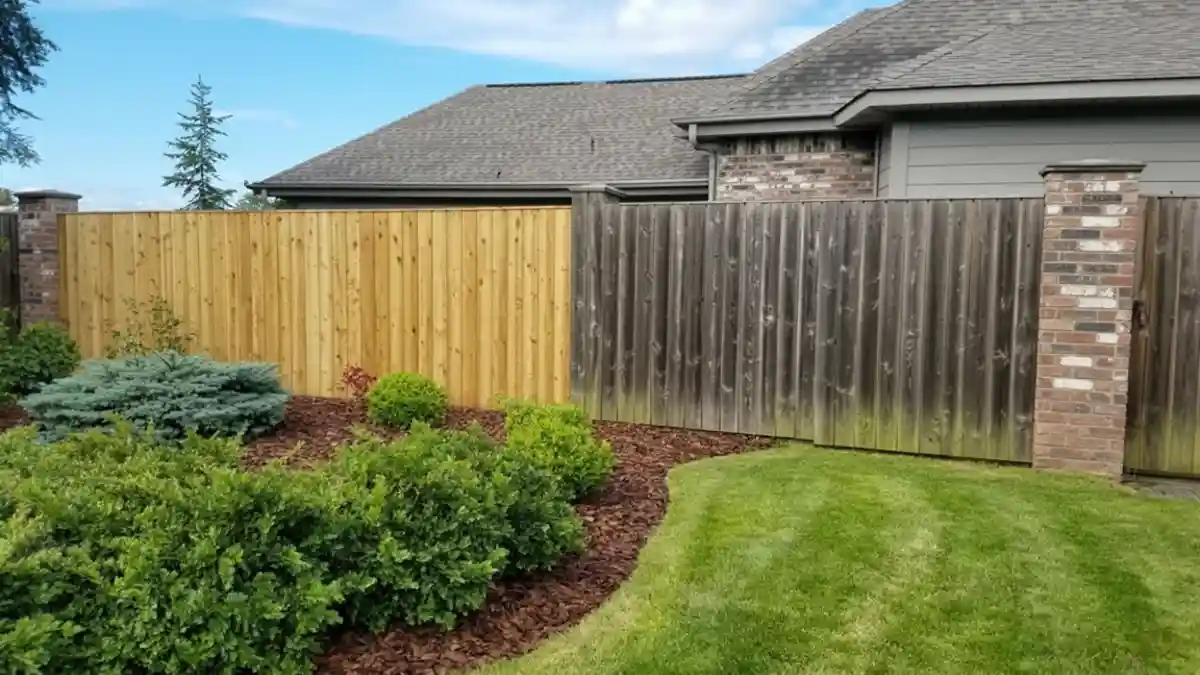
Sun-faded fence boards can make a fresh patio feel tired in seconds. I mean, you step outside, see grey, blotchy wood, and suddenly backyard pride drops a notch. I am not sure but most of us keep putting off power washing, worried about splintering boards, patchy results, or yet another weekend project that never ends.
So here is a different approach: treat power washing as first creative step, not a chore. Clean grain patterns, raw knots, unexpected color shifts – all start to show up once grime disappears. Inside guide below, you will walk through real fence makeovers that spark ideas before stain ever touches wood.
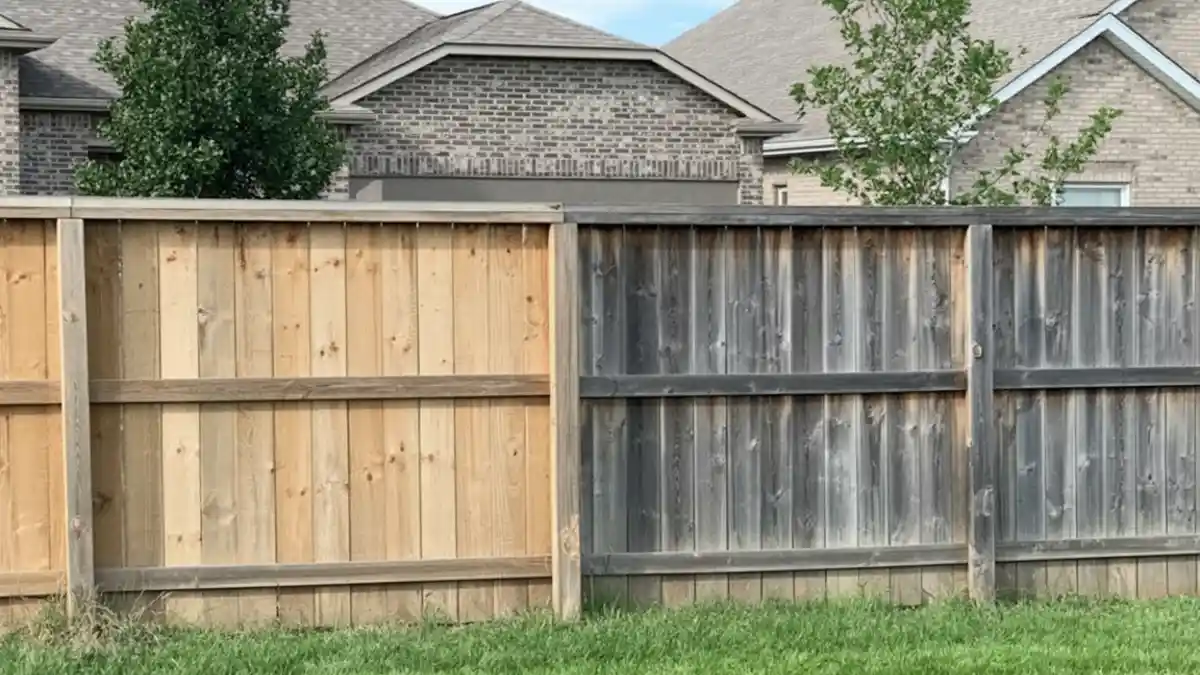
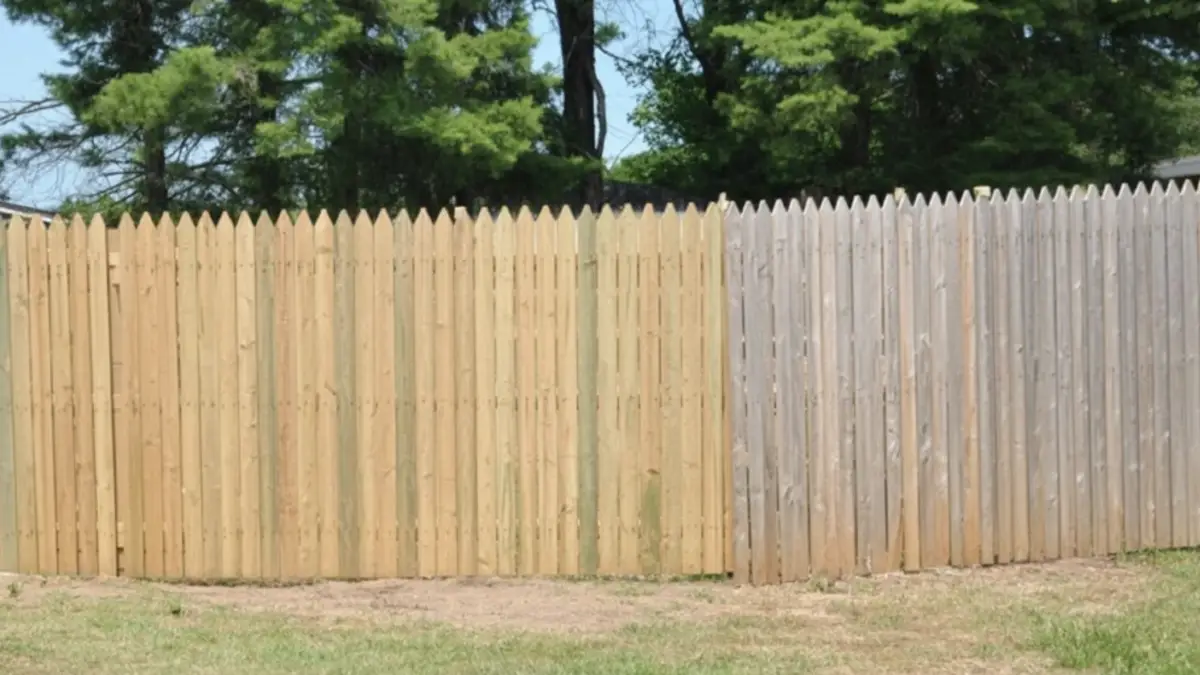
1. Honey-Brown Picket Revival Fence – Wood Restoration Ideas Before Staining
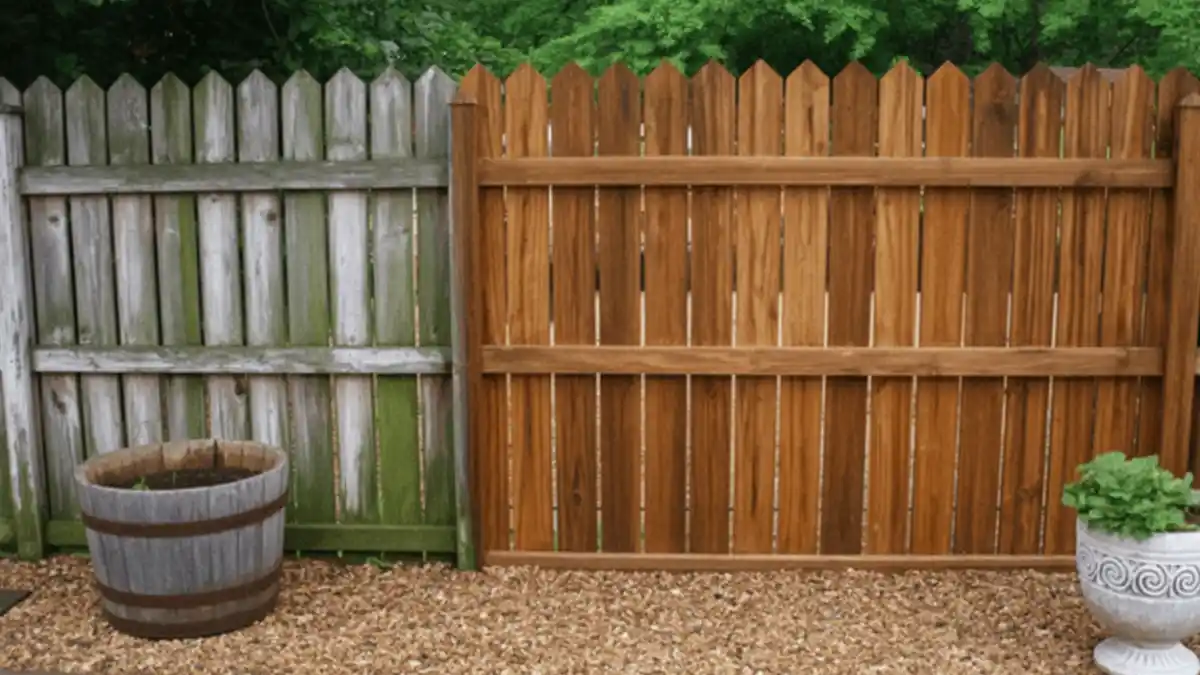
Algae and gray weathering on the left side might convince you the wood is done for, but that is just a surface-level lie. Power washing strips away the years of neglect to reveal strong, beautiful timber that was hiding underneath the grime. Seeing the clean, golden grain return feels like getting a brand-new yard for a fraction of the cost.
Applying stain over that green, mossy mess on the left would be a waste of time since it wouldn’t stick properly. Getting the surface down to raw, clean wood ensures your new finish will penetrate deep and protect the lumber for years. Preparation is the heavy lifting that makes the final coloring stage look professional and last longer.
Even the landscaping seems to pop more when the backdrop isn’t a dull, gray eyesore. That rich, natural wood tone warms up the gravel path and makes the greenery behind it look intentional rather than overgrown. Cleaning up the boundary line upgrades the entire feel of your garden instantly.
2. Golden Gate Revival Fence – Wood Restoration Ideas Before Staining
Gray oxidation acts like a camouflage that hides the true beauty of your lumber, making the yard feel older than it is. Power washing that left panel would instantly match the warm, golden tones of the gate and right side, creating a unified look that feels intentional and well-kept. Stripping away the silver layer is the quickest way to turn back the clock on your property’s age.
Diagonal bracing on the center gate suddenly pops against the vertical slats, showing off the craftsmanship that was previously dull and invisible. You can clearly see how the structural details look sharper and cleaner, turning a functional entry point into a handsome feature of the garden. Paying attention to these heavy-use areas during cleaning ensures they look good every time you walk through.
Applying a finish directly over that weathered left panel guarantees peeling within a year because the wood fibers are dead and clogged. You need the raw, open pores visible on the right side to drink up the stain for deep, lasting protection. Putting in the effort to strip the wood first saves you from having to redo the whole job next summer.
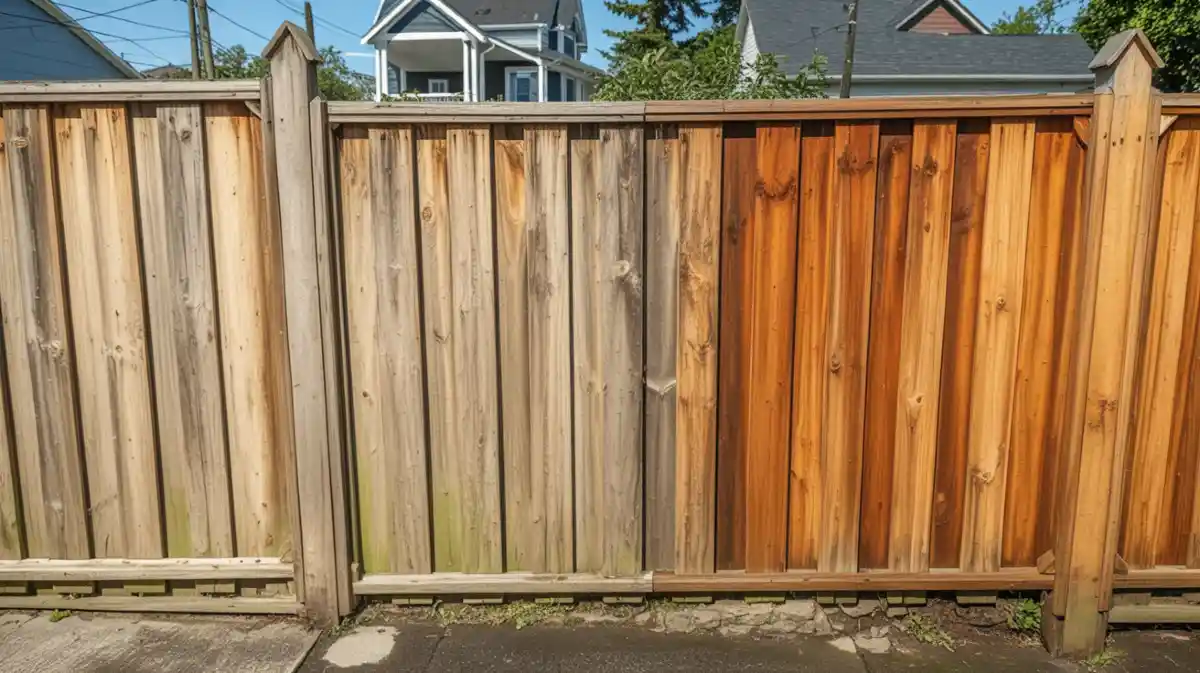
3. Amber Contrast Privacy Fence – Stripping the Gray for a Golden Glow

Seeing that sharp horizontal line halfway down the panel is incredibly satisfying because it offers undeniable proof that the elbow grease is working. Gray, lifeless boards at the bottom look completely unrelated to the vibrant amber wood emerging at the top, almost like two different fences stitched together. Stopping mid-way really highlights just how much grime accumulates over seasons without us noticing.
Orange hues popping out from under the silver oxidation show that the wood itself is still healthy and doesn’t need replacing. Investing a weekend with a pressure washer unlocks that hidden warmth, transforming a drab property line into a bright border that catches the sunlight. Scrubbing off that dead layer is essentially printing money by extending the life of your existing investment.
Cleaning the top cap rail and the grooves between boards is crucial for a uniform finish later on. Missed spots or shadow lines will show through a semi-transparent stain, so getting that consistent, bare-wood look across the entire run is non-negotiable. Thorough washing now means the final color will look professional and sleek rather than patchy and amateur.
4. Vivid Amber Corner Transformation – Restoring the Glow to Weathered Wood
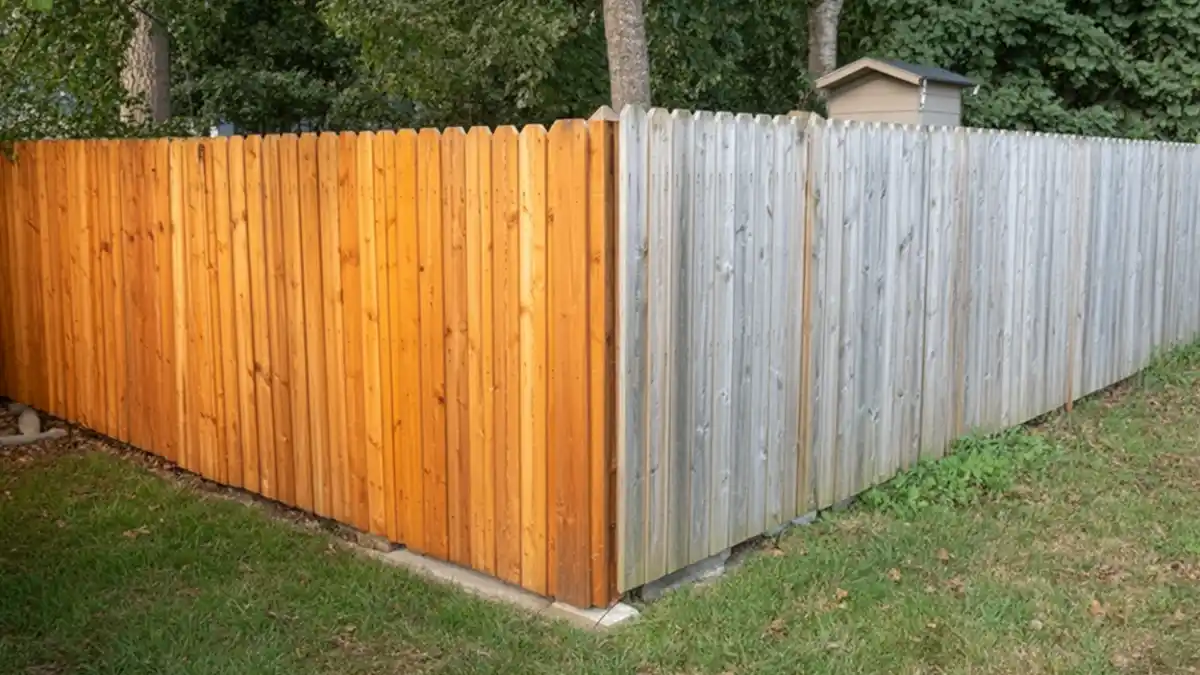
Turning the corner reveals a startling difference between the neglected past and the restored future, almost as if two different fences were built side-by-side. Gray, oxidized timber on the right looks brittle and cold, while the left side radiates a warmth that completely changes the feel of the backyard. Seeing such a stark split right at the hinge proves that beneath the silver patina, fresh lumber is just waiting to be uncovered.
Knots and grain patterns stand out beautifully on the washed section, adding texture that the gray side completely masks. Heavy oxidation acts like a blurry filter, hiding the natural details that give wood its charm. Stripping that layer away doesn’t just clean the fence; it brings the high-definition character back to your backyard boundary.
Applying stain to the gray side would be a disaster because the clogged pores can’t absorb the protective oils properly. Freshly exposed wood fibers on the left act like a sponge, ready to drink up the sealer for maximum longevity. Proper cleaning creates the necessary canvas for a finish that actually lasts through the winter.
5. Deep Auburn Sunset Fence – Wood Restoration Ideas Before Staining
Dull, gray boards on the left act like a mood dampener for the whole backyard, absorbing light instead of reflecting it. Power washing paves the way for that rich, auburn tone on the right to finally shine through and warm up the landscape. It creates a vibrant backdrop that actually frames your lawn instead of fading into the background.
Slapping a coat of stain directly onto that silver oxidation is a recipe for peeling within months. Stripping the surface down to fresh fibers allows the wood to hold onto that deep, protective color effectively. Prep work is the secret ingredient that turns a temporary fix into a long-lasting renovation.
Replacing an entire perimeter fence costs a fortune, but restoration offers the same curb appeal for a fraction of the price. Taking the time to blast away the years of weathering makes the structure look like it was installed yesterday. Your wallet will thank you for choosing maintenance over replacement.
6. Sunny Amber Restoration Fence – Stripping the Years Before Staining

Mossy green patches and dark gray weathering on the left side might make you think the wood is rotting away, but it is often just a dirty mask. Blasting that grime off reveals a bright, solar-amber tone that completely changes the energy of the backyard. It feels like erasing a decade of wear and tear in a single afternoon.
Watching the high-pressure mist cut through the buildup is mesmerizing and shows exactly how deep the cleaning needs to go. You can see the distinct line where the old surface meets the fresh grain, proving that the timber underneath is still solid and healthy. Tackling this project yourself connects you to the home improvement process in a tangible way.
Staining over that algae-covered section would be a nightmare because the wood is too clogged to accept any new color. Opening up the pores with a good wash ensures the new finish soaks in deep for actual protection against the elements. Taking the time to prep the canvas is the only way to guarantee a professional result that handles the weather.
7. Natural Blonde Backyard Barrier – Wood Restoration Ideas Before Staining
Weathered planks on the right might convince you the structure is ancient, but that pale gold section on the left proves there is plenty of life left in the lumber. Stripping away that dark, gloomy layer instantly brightens the entire yard, making the grass look greener and the brickwork behind it pop. Cleaning offers a “new fence” feeling without the hefty contractor’s invoice attached to a full replacement.
Grain patterns and rustic knots emerge clearly on the restored side, showing off a texture that was completely lost under the heavy gray oxidation. Getting down to that raw, dry surface is critical because stain needs open pores to latch onto, not a barrier of dead wood cells. Prepping the surface properly ensures your future color choice creates a rich, uniform finish rather than a muddy, peeling mess.
Neighborhood standards get a massive boost when you tackle unsightly boundary lines that have turned dull over time. Restoring the wood to its original creamy tone complements the warm brick of the surrounding homes much better than the neglected, shadowy look of the unwashed section. Spending a Saturday on maintenance protects your investment and keeps the backyard looking intentional and cared for.
8. Deep Mocha Poolside Barrier – Reviving the View Before Staining
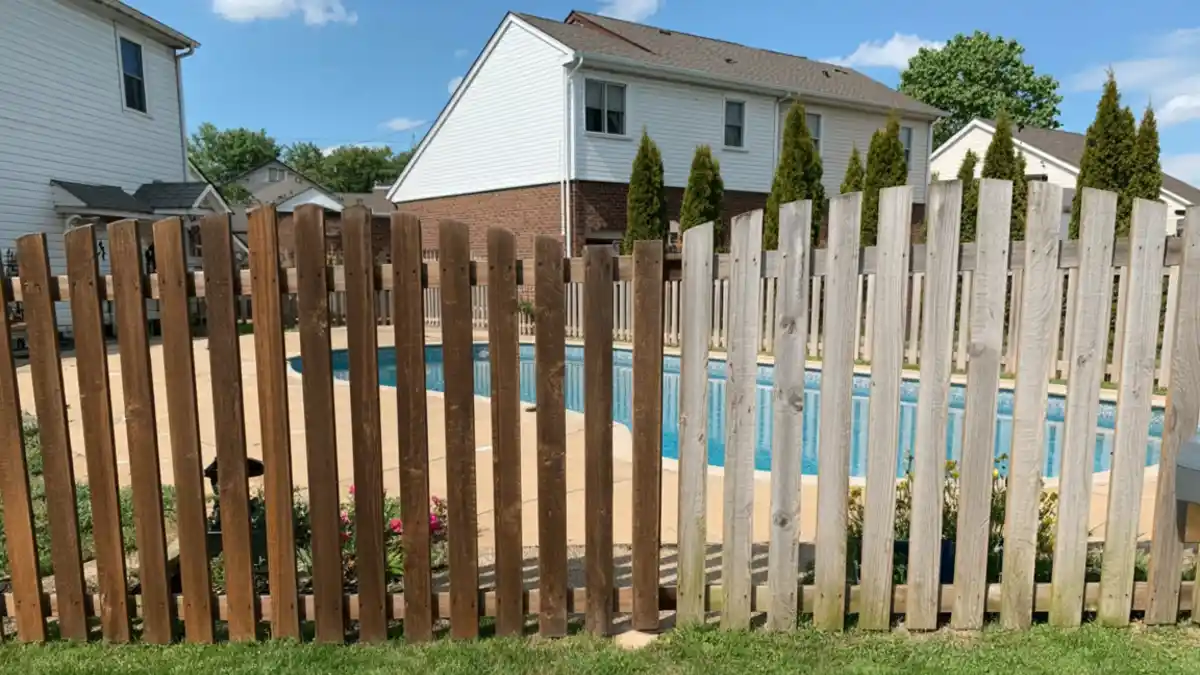
Gray pickets on the right drag down the vibe of the whole pool area, making it feel older and more neglected than it really is. Blasting away that surface layer reveals a deep, rich wood tone on the left that frames the blue water perfectly. It shifts the atmosphere from run-down to inviting just by cleaning the perimeter.
Green algae creeping up the bottom of the dry boards is a clear warning sign that moisture is trapped and causing damage. Washing that slime away exposes the healthy grain underneath and stops rot from eating your investment. You need a clean slate like the left side before you even think about opening a can of stain.
Wet wood on the left gives you a perfect preview of how a clear seal or tint will look once the project is finished. It proves that the natural color is still there, just hiding under a layer of sun damage. Seeing that rich, dark tone emerge gives you the confidence to finish the job right.
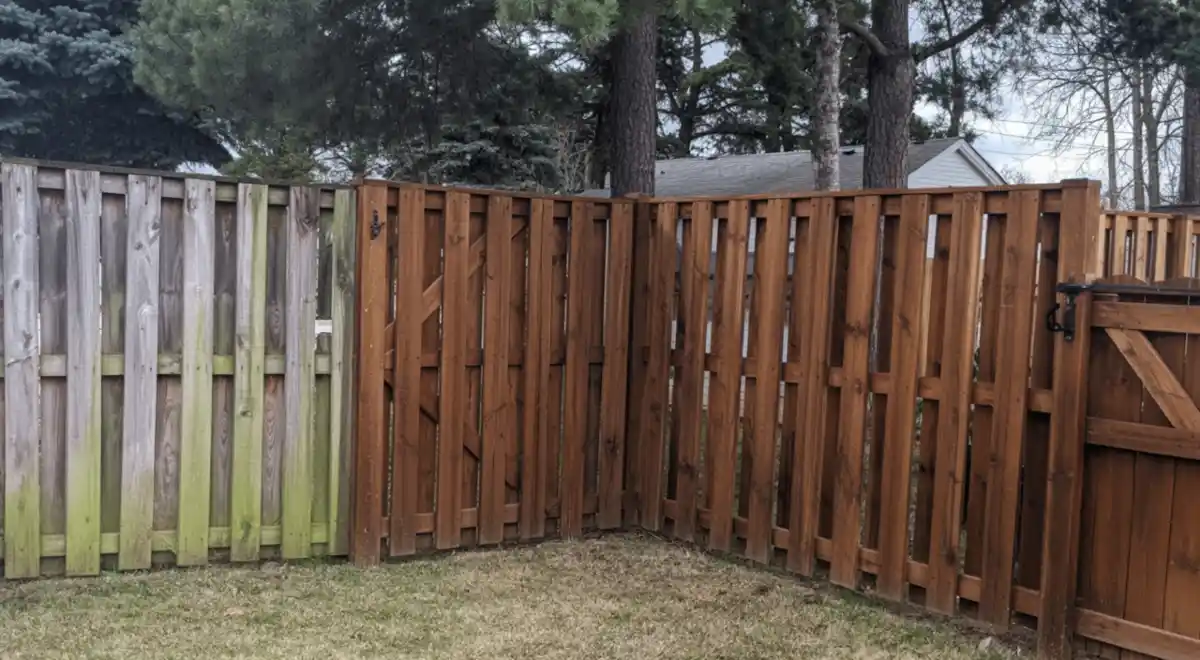
9. Rustic Cedar Shadowbox Revival – Restoring the Grain Before Staining
Splitting the view right down the middle exposes just how deceptive a layer of gray oxidation can be. On the left, the timber looks ready for the scrap heap, but the right side proves there is a rich, fiery cedar tone waiting to be rescued. Seeing the difference confirms that your fence probably just needs a thorough bath, not a complete replacement.
Green algae creeping up the bottom left slats is a silent fence killer that traps moisture against the grain. Blast that fuzz away, and you stop the rot in its tracks while prepping the open pores to actually drink up a protective sealer. Cleaning is the only way to ensure the structure stands strong for another decade.
Vertical boards on the clean side show off intricate knots and a shadowbox depth that the flat, gray weathering completely erases. You lose all that architectural dimension when the wood is covered in years of grime and mildew. Bringing the expensive look of the lumber back to the surface instantly upgrades the value of the whole yard.
10. Deep Walnut Shadowbox – Restoring the Richness Before Staining
That sharp vertical line where the gray stops and the rich brown begins tells the whole story of why we do this. On the left, you see a tired, mossy barrier that looks ready to fall down, but the right side proves the timber is actually strong and full of life. Scrubbing off that dead layer saves you from thinking you need a whole new fence when all you really needed was a good wash.
Green slime creeping up the bottom boards isn’t just ugly; it acts like a sponge keeping your wood wet and rotting. Blasting those algae deposits away reveals the beautiful, dark grain patterns that were hiding underneath the whole time. Getting down to the raw surface is the only way to make sure your next coat of stain actually protects the wood instead of flaking off.
Wet wood fresh from a wash gives you a perfect sneak peek of how a clear or semi-transparent finish will look once it dries. That deep, chocolate tone on the right creates a cozy, private corner that makes the whole backyard feel expensive again. Knowing the potential of your existing lumber makes the hard work of cleaning it feel completely worth it.
11. Rustic Brick & Amber Revival – Wood Restoration Ideas Before Staining
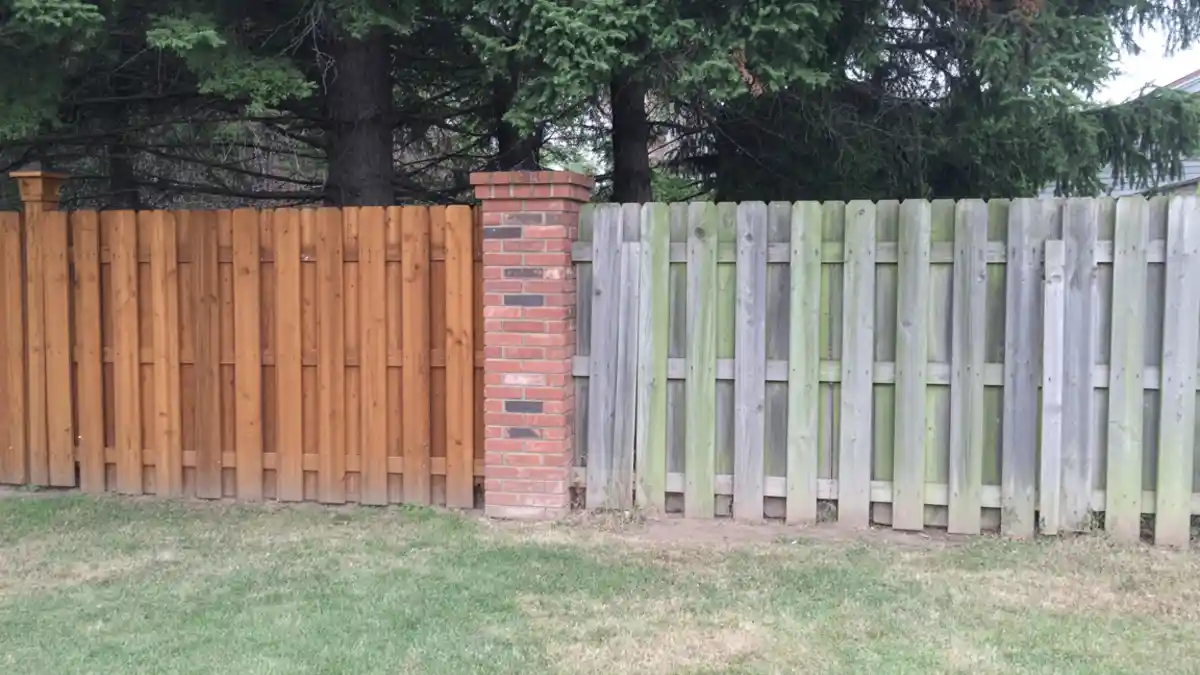
Using that sturdy brick column as a natural dividing line perfectly illustrates the magic of high-pressure cleaning. On the right, the wood looks like it belongs in a haunted house, while the left side radiates a welcoming, warm amber glow that complements the masonry beautifully. Seeing such a clear split helps you visualize exactly how much curb appeal is hiding under layers of neglect.
Green moss creeping up the base of the unwashed pickets does more than just look gross; it actively rots your investment from the ground up. Scrubbing that biological growth away is non-negotiable if you want your new stain to actually adhere to the timber rather than sliding off a slimy surface. Taking care of the bottom edge prevents expensive repairs down the road.
Wet, freshly cleaned wood gives you the most honest preview of how a clear or semi-transparent oil will look once applied. That deep, rich brown on the left isn’t a trick of the light; it is the natural character of the lumber returning to the surface after a deep exfoliation. Knowing that your old fence can look this good again makes the physical effort of washing it feel 100% worth it.
12. Sunshine Yellow Curb Appeal – Street-Side Wood Restoration Before Staining
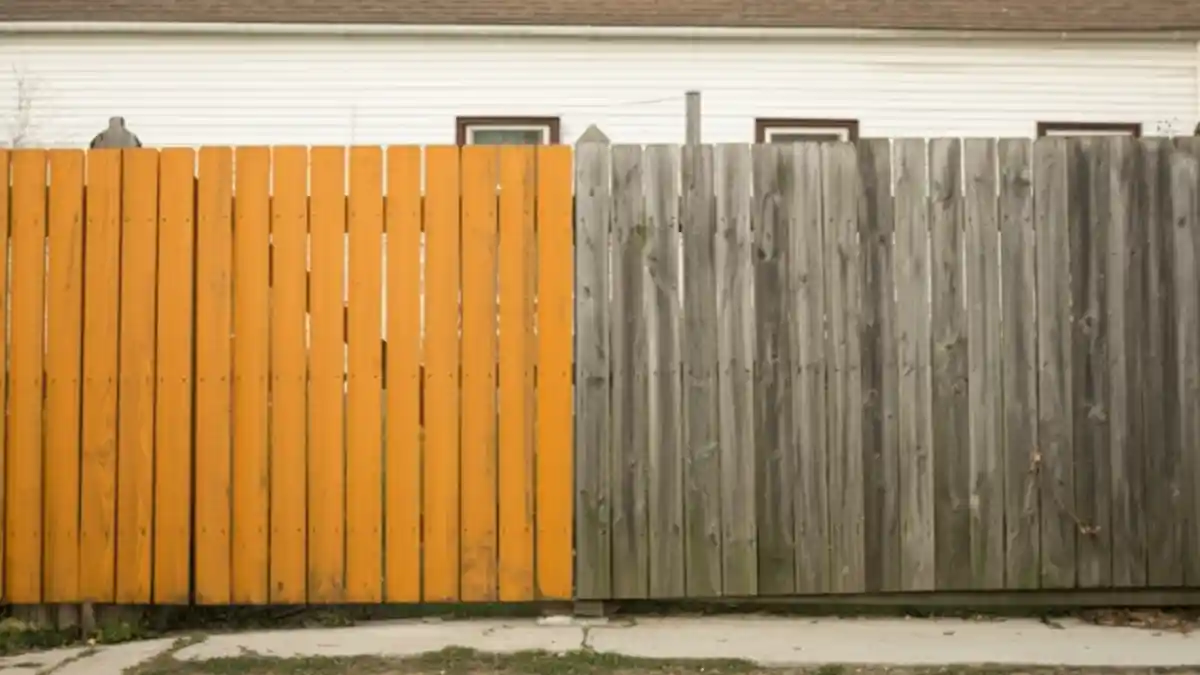
Walking past this fence offers a split-second lesson in property value. That bright, golden section screams “well-cared-for home,” while the grey half just blends into the concrete sidewalk. Cleaning the wood isn’t just about maintenance; it is about reclaiming your home’s presence on the block.
Knots and wood grain completely disappear under that blanket of silver oxidation on the right. Blasting the surface reveals those natural details again, turning a flat, boring barrier into a textured feature with personality. You have to strip away the “dead” layer to see what you are actually working with before choosing a stain color.
Putting a fresh coat of stain on that grey, dirty wood is essentially throwing money in the trash because it will peel right off. You need the raw, open fibers visible on the yellow side to soak up the finish and lock it in. Doing the dirty work of washing first guarantees your weekend project lasts longer than a single season.
13. Buttercream Picket Revival – Wood Restoration Ideas Before Staining
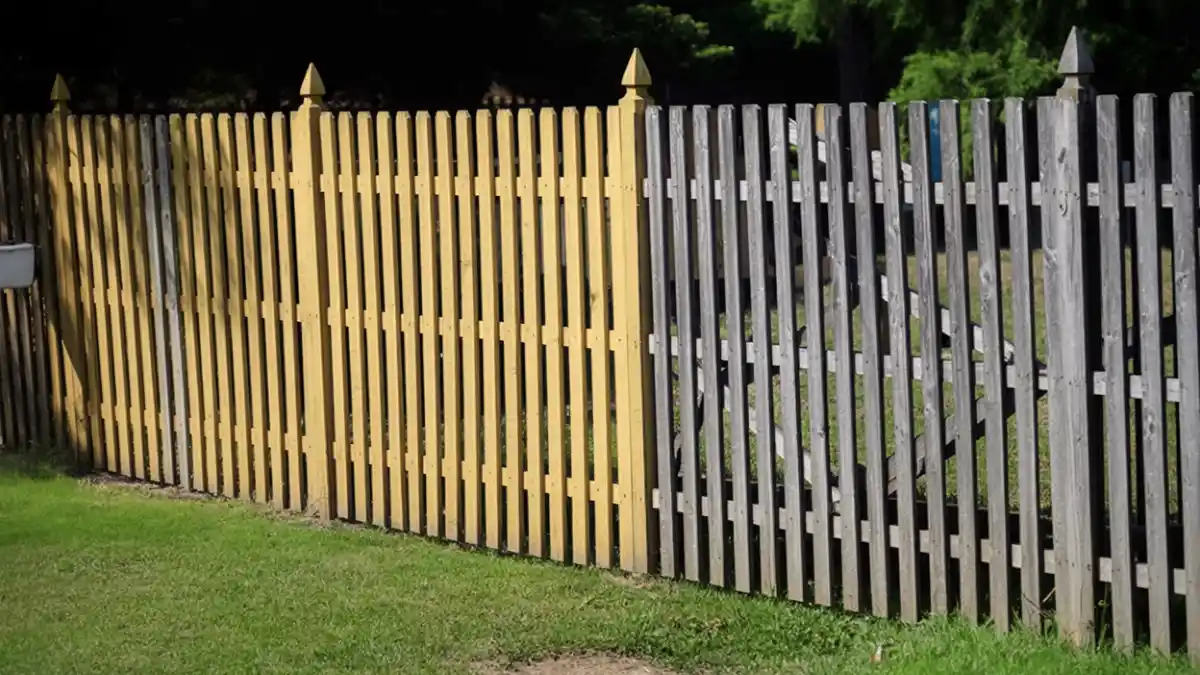
Sunlight hits the restored section and makes it glow with a warm, buttery tone, while the unwashed side seems to absorb light and disappear into the shadows. That stark difference demonstrates how a simple cleaning can upgrade your property’s curb appeal instantly, turning a fading boundary line into a bright focal point. It transforms the mood of the garden from neglected to cherished in just a few hours.
Decorative post caps lose their definition under a blanket of gray oxidation, looking more like old stumps than architectural accents. Blasting away the debris sharpens those lines again, giving the fence a crisp, high-end appearance that stands out against the dark tree line. Restoration brings back the detailed charm that time tried to erase.
Staining directly over that weathered gray surface is basically asking for a peeling disaster within a few months because the wood fibers are dead. You need that raw, porous surface visible on the left to lock in the new color and seal out moisture effectively. Proper prep work is the difference between a temporary fix and a lasting renovation.
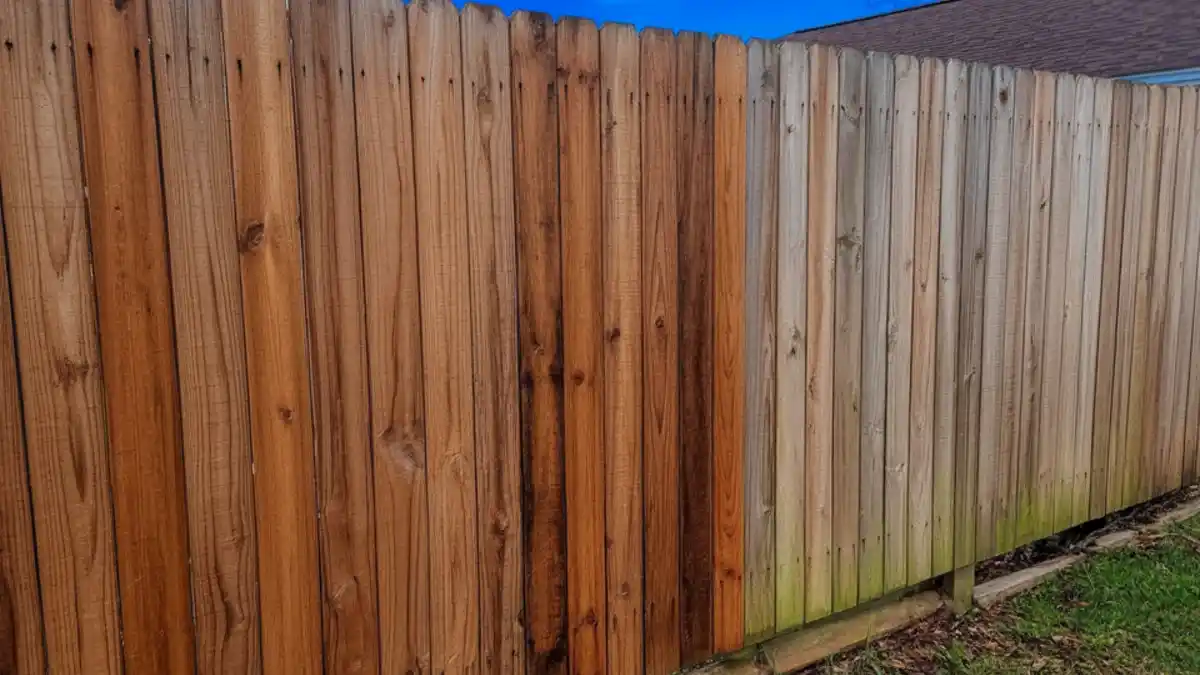
14. Burnt Copper & Charcoal Contrast – Extreme Wood Restoration Before Staining
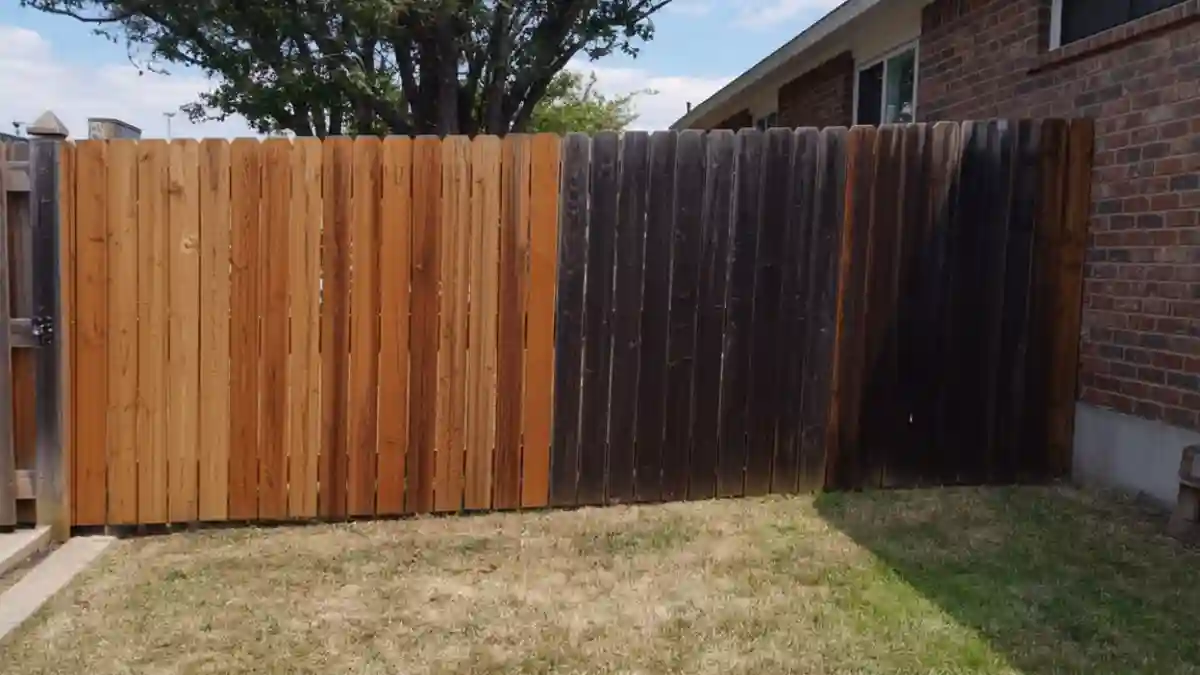
Dark, charcoal-like weathering on the right makes the yard feel enclosed and heavy, almost absorbing the sunlight like a black hole. Stripping that layer off unleashes a vibrant copper tone that instantly opens up the space and reflects the warmth of the sun. Seeing that dramatic transition in real-time is the ultimate motivation to finish the job.
Vertical grain patterns and wood texture are completely lost in the shadow of the dirty side, hidden under a blanket of heavy oxidation. Blast away the debris, and you suddenly have a detailed, interesting surface that is actually clean enough to bond with a high-quality stain. You simply cannot beautify what you can’t even see.
Contractors would charge a small fortune to tear this down and rebuild it, yet the “after” section proves the existing materials are perfectly fine. Reviving the lumber instead of dumping it keeps distinct money in your pocket and reduces construction waste. It is a high-reward sweat equity project that pays off immediately.
15. Pale Blonde Picket Perfection – Wood Restoration Ideas Before Staining
Pale, blonde wood on the left looks like it was installed yesterday, contrasting sharply with the ghost-town gray on the right. Scouring off that oxidation proves that your fence still has plenty of structural integrity and aesthetic value left to give. Uncovering that original color feels like finding money in the pocket of an old coat.
Gray, weathered fibers act as a barrier that prevents stain from soaking into the lumber, leading to patchy results that peel in no time. Washing the surface opens up the wood grain, creating a thirsty canvas that will eagerly drink up whatever sealer you choose. Doing the hard work now is the only insurance policy for a finish that actually lasts.
Faint green tints visible on the clean slats are actually a good sign, indicating the pressure treatment chemicals are still active and protecting against rot. Removing the gray layer lets you assess the health of the wood and prepare it for a toner that will neutralize those green hues into a warm honey brown. Restoring the surface gives you a clean slate to correct the color balance of your backyard.
16. Honey-Gold Garden Backdrop – Wood Restoration Ideas Before Staining
Manicured shrubs and rich, dark mulch on the left side suddenly look vibrant against that restored golden wood, whereas the gray section makes the exact same landscaping feel dull and forgotten. Stripping away the weathering creates a bright, cheerful perimeter that actually complements your gardening efforts instead of fighting against them. A clean fence serves as a spotlight for your plants rather than a shadowy backdrop.
Mossy green discoloration creeping up the bottom of the unwashed slats is a major red flag for anyone hoping to apply a new finish. Staining over that biological growth guarantees the color will flake off as the algae continues to live and breathe under the surface. Scrubbing the wood down to bare, sterile fiber is the only way to ensure your new stain bonds permanently.
Handsome brick pillars act as the perfect frame for the restoration, highlighting the dramatic difference between the “before” and “after” states.
Fresh, blonde pine brings out the warm red tones in the masonry, creating a cohesive and expensive look that the dirty gray boards completely wash out. coordinating your fence maintenance with your hardscaping elevates the entire architectural feel of the home.
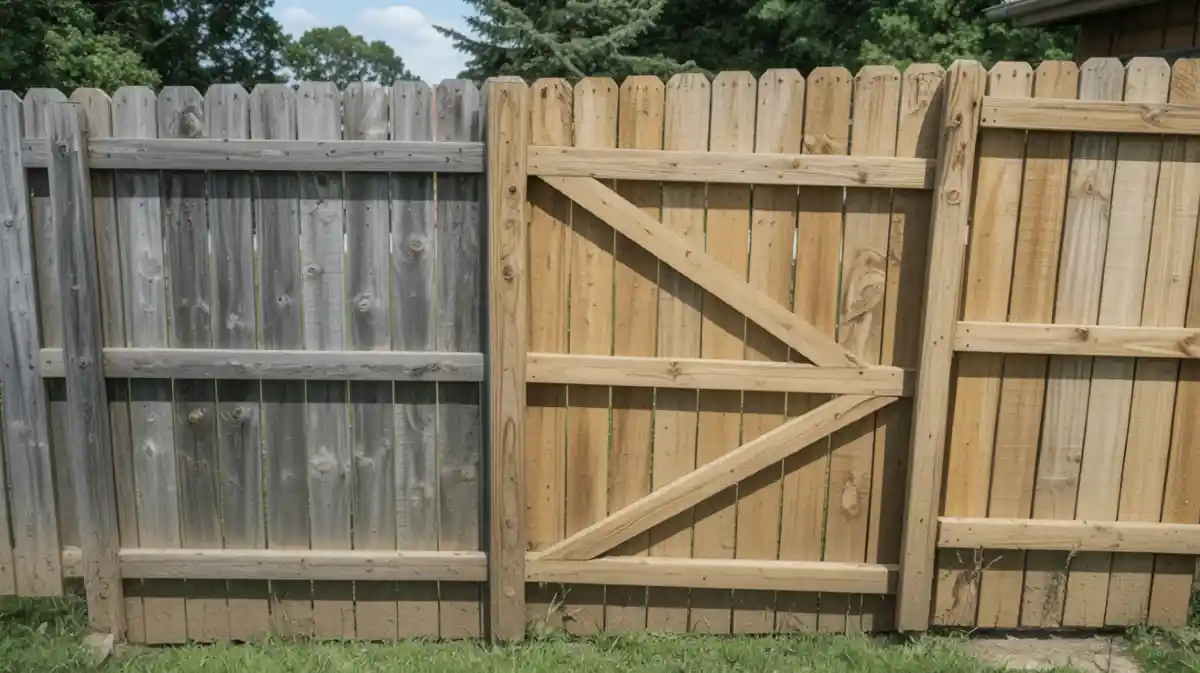
17. Raw Blonde Farmhouse Gate – A Clean Slate Before the Stain
Achieving that raw, creamy pine look on the double gate completely resets the clock on your backyard’s age, making the structure look freshly built rather than just washed. It provides a crisp, bright focal point that invites you into the space, proving that deep cleaning is the essential first step before applying any color.
Matte black hinges and latches suddenly look like intentional design features rather than just functional metalware when the backdrop is free of grime. Scrubbing around those fittings requires patience to avoid chipping the paint, but the high-contrast payoff creates a custom, high-end finish that elevates the whole garden.
Comparing the naked wood of the gate to the deeper, golden tones of the adjacent fence illustrates the importance of starting with a neutral base. You need that dry, light surface to ensure your new stain matches the existing sections perfectly, eventually blending the various parts into a seamless boundary.
18. Deep Mahogany Wet-Look Fence – Revealing the Grain Before Staining
Soaking wet wood on the left displays exactly what a high-quality stain will achieve, offering a rich mahogany preview that makes the gray side look lifeless in comparison. You can immediately see how the water brings out the deep red undertones, proving that the fence isn’t old, it is just thirsty. Cleaning acts as the trailer for the main event of staining.
Green algae clinging to the base of the unwashed planks is a silent destroyer that traps moisture against the grain and accelerates rot. Scrubbing that biological growth away creates a sterile surface, ensuring your expensive sealer bonds to the wood rather than a layer of slime. Remedying the bottom foot of the fence is often the most critical part of the entire restoration.
Knots and vertical grain patterns pop with high definition on the cleaned section, whereas the heavy oxidation on the right acts like a blur filter that hides all the texture. Stripping the gray layer allows the natural character of the timber to shine, returning the fence to its original role as a beautiful property border. Reviving the material is far more satisfying than staring at a blank, silver wall.